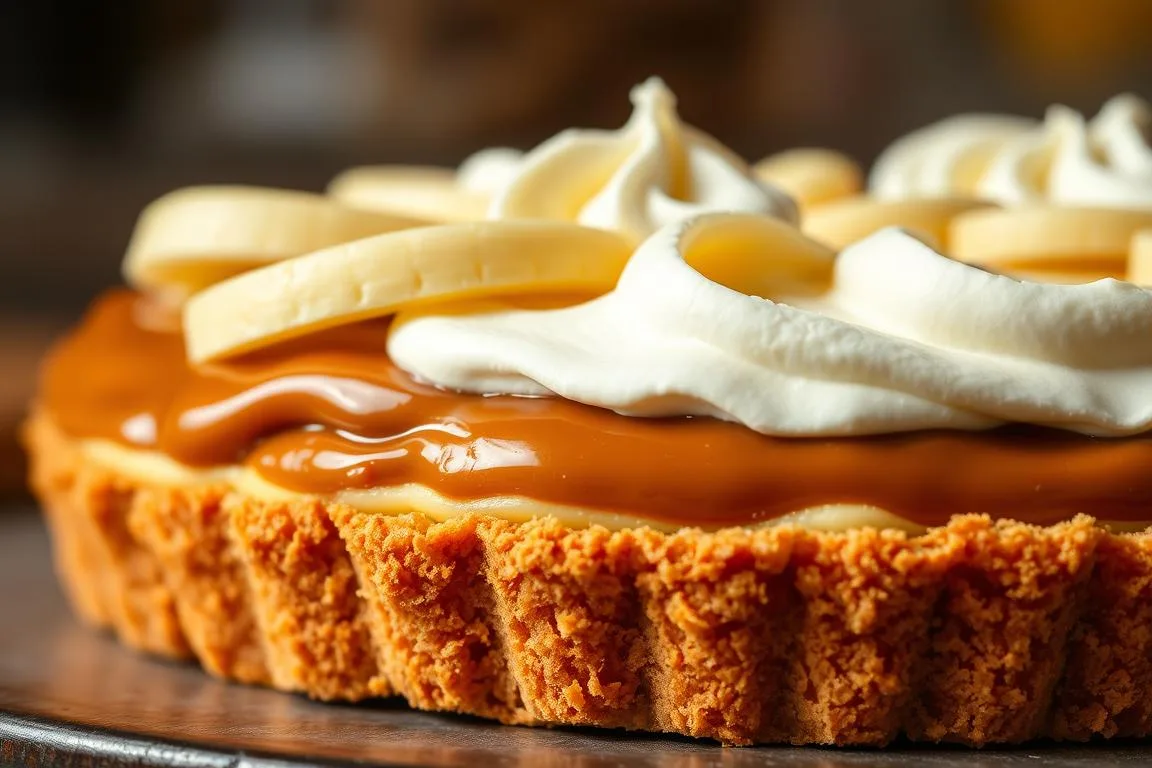
There’s something magical about creating a dessert that brings smiles to the table. Imagine the rich layers of golden toffee, fresh bananas, and fluffy whipped cream nestled in a crunchy, buttery crust. This recipe is your ticket to making that dream a reality in your own kitchen.
With just a few simple ingredients like melted butter, heavy cream, and a ready-made pie crust, you can whip up this classic treat with ease. The best part? Minimal baking is required, making it perfect for any occasion. Whether you’re a seasoned cook or a beginner, this guide will walk you through every step.
From prepping the crust to layering the silky sauce, each detail is designed to ensure a spectacular result. You’ll love the balance of textures—crunchy, creamy, and smooth—all in one bite. So, roll up your sleeves and get ready to create a dessert that’s as delightful to make as it is to serve.
Understanding Banoffee Pie: Origins and Appeal
Dive into the fascinating story behind one of Britain’s most beloved desserts. This treat has a rich history that dates back to the 1970s, when it was first created in East Sussex by Nigel Mackenzie and Ian Dowding. What started as an experiment quickly became a sensation, blending banana and toffee into a layered masterpiece.

The name itself reflects its unique identity—combining “banana” and “toffee” to describe its core flavors. Over the years, this dessert has become a staple in British culinary traditions, often appearing on menus across the UK and beyond. Its simplicity and decadence have made it a favorite for both casual gatherings and special occasions.
The British Legacy and Sweet History
This dessert’s journey began in a small restaurant in East Sussex. Mackenzie and Dowding aimed to create something new and exciting, and their innovation paid off. By simmering sweetened condensed milk to create a rich dulce de leche, they crafted a filling that’s both creamy and indulgent. This technique remains a cornerstone of the recipe today.
From its humble beginnings, the dessert gained popularity, spreading across the UK and eventually making its way to international tables. Its versatility and crowd-pleasing nature have cemented its place as a classic.
What Makes This Dessert Irresistible?
What sets this treat apart is its perfect balance of textures and flavors. The crunchy crust, smooth filling, and fresh bananas create a harmony that’s hard to resist. It’s no wonder it’s a hit at potlucks and family gatherings, turning any day into a celebration of sweetness.
Whether you’re enjoying it at a casual get-together or savoring it as a special treat, this dessert offers a taste of tradition and innovation in every bite. Its enduring appeal lies in its ability to bring people together, making it a timeless favorite.
Essential Ingredients, Tools, and Prep Tips
The foundation of any great dessert lies in quality components and preparation. Whether you’re a seasoned baker or a beginner, having the right ingredients and tools ensures your creation turns out perfectly. Let’s break down what you’ll need to make this classic treat a success.
Key Ingredients: From Sweetened Condensed Milk to Ripe Bananas
Start with a can of sweetened condensed milk. This is the base for the creamy toffee layer. Simmering it for an hour transforms it into a rich, silky filling. Next, choose perfectly ripe bananas. Their natural sweetness enhances the dessert’s flavor and balances the richness of the toffee.
Don’t forget quality butter for the crust. It adds a rich, buttery flavor that complements the other layers. For an optional twist, add grated chocolate as a garnish. Its slight bitterness contrasts beautifully with the sweetness of the filling.
Must-Have Kitchen Tools for Your Recipe
Having the right tools makes the process smoother and more enjoyable. A food processor is essential for creating fine cookie crumbs for the crust. An electric mixer ensures your whipped cream is light and fluffy. A sturdy pie dish and a sharp knife for slicing bananas complete your toolkit.
| Tool | Purpose |
|---|---|
| Food Processor | Crush cookies for the crust |
| Electric Mixer | Whip cream to the perfect consistency |
| Pie Dish | Hold and bake the dessert |
| Sharp Knife | Slice bananas evenly |
Before you begin, measure all your ingredients accurately. This ensures consistency and prevents last-minute surprises. Clear your workspace and organize your tools for efficiency. Taking these steps will make the process smoother and more enjoyable.
Investing a little extra time in selecting the best ingredients and tools will elevate your dessert. The result? A treat that’s as delightful to make as it is to serve.
Step-by-Step Guide to Crafting Your Banoffee Pie
Mastering this classic dessert starts with a solid foundation. Each step is designed to ensure a perfect balance of textures and flavors. Let’s walk through the process together.
Creating a Crunchy Crust with Graham Crackers or Digestive Biscuits
Begin by grinding graham crackers or digestive biscuits into fine crumbs. Mix the crumbs with melted butter and a touch of sugar. Press this mixture firmly into a pie dish to form the base.
Bake the crust for 10 minutes at 350°F. This step ensures it’s sturdy yet tender. Let it cool completely before adding the next layer.

Transforming Sweetened Condensed Milk into Silky Dulce de Leche
Pour a can of sweetened condensed milk into a baking dish. Place the dish in a larger pot filled with water, creating a water bath. Bake for 60 minutes at 425°F, stirring occasionally.
This process caramelizes the milk, turning it into a rich, silky dulce de leche. Let it cool before spreading it over the crust.
Layering Fresh Bananas and Billowy Whipped Cream
Slice ripe bananas evenly and arrange them in one or two layers over the caramel. This adds natural sweetness and a fresh texture.
Whip heavy cream until it reaches medium peaks. Spread it gently over the bananas for a light, airy finish. Chill the dessert for at least 30 minutes before serving.
With these steps, you’ll create a dessert that’s as delightful to make as it is to enjoy.
Expert Tips and Techniques for Culinary Success
Crafting a dessert that delights requires precision and a few expert tricks. Achieving the perfect balance of textures and flavors can elevate your creation from good to unforgettable. Let’s dive into some pro tips to help you master the art of this classic treat.
Achieving the Ideal Texture and Balanced Flavors
Monitoring the caramelization process is crucial. Keep a close eye on the dulce de leche to avoid overcooking or undercooking. Stir occasionally to ensure even consistency. This step ensures a smooth, rich filling that’s neither too thick nor too runny.
Adjusting baking and cooling time is another key factor. Allow the crust to cool completely before adding the filling. This prevents sogginess and ensures a crisp crumb. Similarly, let the dessert chill for at least 30 minutes before serving to let the flavors meld perfectly.
Balancing sweetness is essential. Use slightly unsweetened whipping cream to counteract the richness of the condensed milk. This creates a harmonious blend of flavors that’s not overly sweet. For an extra touch, add a dash of salt to enhance the overall taste.

Maintaining an even consistency throughout the dessert ensures every bite is a delight. Spread the filling and cream layers evenly, and slice bananas uniformly. This guarantees a perfect mix of textures in every serving.
If you encounter issues like a runny filling or a dense crust, don’t worry. Simple adjustments can save the day. Add a bit more butter to the crust or chill the filling longer to firm it up. These small tweaks can make a big difference.
| Issue | Solution |
|---|---|
| Runny Filling | Chill longer or add a thickening agent |
| Dense Crust | Add more butter or reduce baking time |
| Overly Sweet | Use unsweetened whipping cream |
| Uneven Layers | Spread filling and cream evenly |
With these expert tips, you’ll be well-equipped to create a dessert that’s as impressive as it is delicious. Happy baking!
Innovative Variations and Creative Twists on Banoffee Pie
Exploring new ways to elevate a classic dessert can spark creativity in the kitchen. By experimenting with alternative crusts, fillings, and toppings, you can tailor this treat to suit your preferences or special occasions. Let’s dive into some exciting ideas to make your dessert uniquely yours.
Alternative Crusts and Filling Methods
Swap the traditional graham cracker crust for something unexpected. Chocolate wafers or digestive biscuits can add a rich, unique flavor. Use a food processor to crush the cookies finely, then mix with melted butter for a firm base. This small change can transform the texture and taste of your dessert.

For the filling, try different methods to prepare the dulce de leche. Instead of baking sweetened condensed milk, use a slow cooker for a hands-off approach. Simply place the unopened can in water and cook on low for 8 hours. This technique yields a smooth, caramelized filling with minimal effort.
Add a personal touch with extra ingredients. Chopped nuts, shaved chocolate, or a swirl of peanut butter can introduce new flavors and textures. These additions make the dessert more versatile and exciting.
Adapt the recipe to fit your tools and time. If you don’t have a food processor, use a rolling pin to crush cookies. For a quicker filling, try stovetop caramelization. These tweaks ensure the dessert remains accessible and enjoyable for everyone.
Creative variations not only make the dessert more fun to prepare but also allow you to customize it for different tastes and occasions. Whether you’re hosting a party or enjoying a quiet night in, these ideas will make your dessert stand out.
Conclusion
Creating a dessert that combines rich flavors and textures is both rewarding and enjoyable. From the crunchy crust to the silky dulce de leche, each layer plays a vital role in achieving the perfect balance. Fresh banana slices and fluffy whipped cream add a refreshing touch, making every bite a delight.
Remember, mastering this treat is easier than it seems. Use sweetened condensed milk for the caramel filling and let it chill to set the layers. Expert tips like adjusting baking times and using unsweetened cream ensure your dessert turns out just right.
Feel free to experiment with variations, like adding chocolate shavings or trying alternative crusts. Share your creation with loved ones and enjoy the satisfaction of making a restaurant-style dessert at home. Keep exploring new recipes to keep your kitchen adventures exciting!
FAQ
Can I use store-bought dulce de leche instead of making it from sweetened condensed milk?
Yes, you can use store-bought dulce de leche to save time. It works just as well in the recipe.
How long does it take to make dulce de leche from sweetened condensed milk?
Simmering a can of sweetened condensed milk in water takes about 2-3 hours. Alternatively, you can use a pressure cooker for a quicker method.
Can I prepare the crust ahead of time?
Absolutely! You can make the crust a day in advance. Just store it in an airtight container to keep it fresh.
What’s the best way to slice bananas for the dessert?
Use ripe bananas and slice them evenly, about ¼-inch thick, to ensure a consistent texture in every bite.
How do I prevent the whipped cream from deflating?
Chill your mixing bowl and beaters before whipping the cream. Whip it to soft peaks for a stable, fluffy texture.
Can I add chocolate shavings on top?
Yes, chocolate shavings or grated chocolate make a delicious and visually appealing garnish for this dessert.
How long should I chill the dessert before serving?
Chill it for at least an hour to allow the layers to set properly. For best results, refrigerate it overnight.
Can I use a different type of crust?
Yes, you can experiment with alternatives like Oreo crumbs, shortbread, or even a gluten-free base for a unique twist.
Is it possible to make this dessert dairy-free?
Yes, use coconut cream instead of whipped cream and a dairy-free alternative for the dulce de leche.
How do I store leftovers?
Keep leftovers covered in the refrigerator for up to 2 days. The bananas may darken slightly, but the flavor will remain delicious.